Named Regions
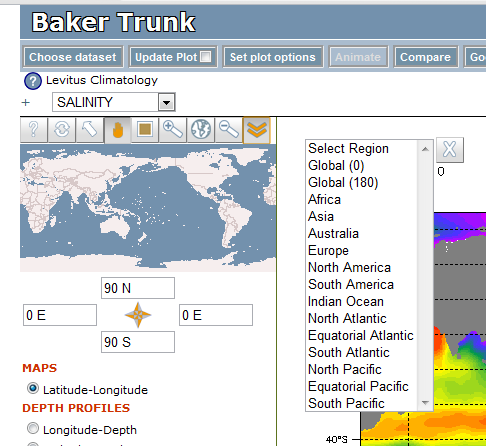
By default the map widget will display a list of name regions when the user pushes the double down arrow button on the right of the button panel. These regions are defined in the LAS configuration 
XML in the ui.xml file.
The region definitions look like this:
 <menu type="regions" name="Regions_Default">
 <item values="-180,180,-90,90">Global (0)</item>
 <item values="0,360,-90,90">Global (180)</item>
 <item values="-20, 60, -40, 40">Africa</item>
 <item values="40, 180, 0, 80">Asia</item>
 <item values="110, 180, -50, 0">Australia</item>
 <item values="-10, 40, 30, 75">Europe</item>
 <item values="-170, -50, 10, 75">North America </item>
 <item values="-90, -30, -60, 15">South America</item>
 <item values="20,120,-75,30">Indian Ocean</item>
 <item values="-80, 20, 0, 70">North Atlantic</item>
 <item values="-80, 20, -30, 30">Equatorial Atlantic</item>
 <item values="-70,25,-75,10">South Atlantic</item>
 <item values="110, 260, 0, 70">North Pacific</item>
 <item values="135,285,-30,30">Equatorial Pacific</item>
 <item values="150, 290, -70, 0">South Pacific</item>
 </menu>
Please note when you are making your own regions and you want the region to cross the International Date Line you should use a positive value for the east longitude (as is done for the Pacific regions in this list.
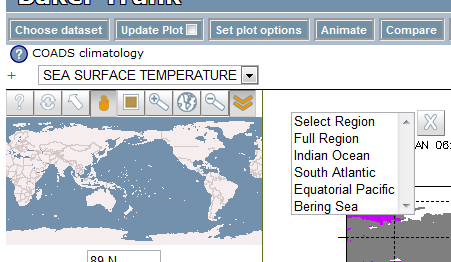
Now, supposing you want to make a limited set of Ocean regions to assign to your data set, you beging by creating a new block of region definitions with a menu element in the ui.xml file. For example:
 <menu type="regions" name="Regions_PMELOcean">
 <item values="-360,360,-90,90">Full Region</item>
 <item values="20,120,-75,30">Indian Ocean</item>
 <item values="-70,20,-75,5">South Atlantic</item>
 <item values="135,285,-30,30">Equatorial Pacific</item>
 <item values="162,202,50,73">Bering Sea</item>
 </menu>
In this case, we've given our region the name Regions_PMELOcean. We'll need to refer to that name later in the configuration. The defined regions are are part of the the specification for the map widget. For historical reasons this bit of information also included an image that was used for the basemap of the map widget. While this is no longer needed you still need to build this bit of configuration using the default image specification. This section looks like this:
 <map type="livemap" name="PMELOceanLivemap">
 <image href="#Image_PMELOcean"/>
 <menu href="#Regions_PMELOcean"/>
 </map>
This in turn is included in the bundle of information that makes up what is called a "default". (Again a concept that has lost its meaning over time, but that is what the element is called). A "default" includes the specification of the map, the operations, the views and the options. In our case we will use the default values for all of those things except the map which includes our new region definitions.
 <default name="PMELOceans">
 <map href="#PMELOceanLivemap"/>
 <map href="#DefaultOperations"/>
 <map href="#DefaultViews"/>
 <map href="#DefaultOptions"/>
 </default>
Once you have the "default" built you have to refer to it some where in you data set configuration to tell LAS when you want to use it. In this case we'll use it for all of the variables in the COADS data set that comes with LAS. Editing the coads.xml file we add the specification of the default to the properties associated with the data set.
 <properties>
 <ferret>
 <land_type>shade</land_type>
 </ferret>
 <ui>
 <default>file:ui.xml#PMELOceans</default>
 </ui>
 </properties>
Again you have to use some magical incantations that are relics of times past and specify the name of the default you want to use with the complicated syntax shown in the example (file:ui.xml#PMELOceans).

Now, once all of these changes are in place, if you redeploy and restart your server your COADS data sets will show the new set of named regions when the user clicks on the button.


